


«prev: ‘WinLens3D - Tilts 3: Prisms’ next: ‘WinLens3D - interactive glass map - an introduction’»
Clip summary all WinLens3D clipsall WinLens3D Basic clips tell a friend
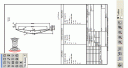
We will show how to setup some reflective scanners, in such a way that it is easy to model the scanning motion of the mirrors using surface and component level tilts on the fold mirrors.
The basic geometry of the system is created by applying surface level tilts to the fold mirrors, which by default, folds the reference axis by 2x the tilt angle.
To model scanning a mirror without changing the geometry [the global location of any other component], we apply a component level tilt to the mirror.
We then show how to convert this to an X-XY scanner, by just changing the surface tilt on the second mirror from tilt-X to tilt-Y
Finally we inspect a model of a reflective polygon scanner - where a single mirror is used to represent the polygon. As before the surface fold gives the correct system geometry, and the component tilt on the mirror is used to simulate the scanning. This time however we offset the center of tilt of the component tilt to the theoretical polygon center.
To summarise, when setting up mirror scanners:
1) Use the surface tilt on the mirror to fold the reference axes correctly
2) Use the component tilts & offsets on the mirror to simulate scanning
[these clips are hosted at screencast.com - very occasionally they may be unavailable because Screencast is performing maintenance - if so, please come back later]
Keywords for all clips
3d[4] 3d model[1] aspheric[1] aspherics[1] assembly[1] astigmatism[1] autofocus[1] beam waist[1] bookmark[1] camera[1] cdgm[1] cemented doublet[1] cemented triplet[1] chief ray[1] component[1] component tilt[2] conic[1] copy[1] customise[1] decenter[4] defaults[1] density[1] depth of field[1] depth of focus[1] distortion[1] dove[1] drawings[2] editing[1] education[7] envelope[1] flare[1] fold mirror[1] freeze[1] gaussian beam[1] ghost[1] glass[2] glass manager[2] glass map[1] graphics[1] hikari[1] hints[1] hoya[1] introduction[5] iso0110[1] iso10110[5] isoplanetism[1] language[1] laser[1] laser damage[1] lateral colour[1] lens drawing[1] lens families[1] lens selection[1] longitudinal aberrations[1] machine vision[4] machvis[4] manufacturing errors[2] material editor[1] melt[1] monte carlo[2] n-v plot[1] ohara[1] optical glass[1] optical path difference[1] pan[1] paraxial[3] paraxial raytrace[1] partial dispersion[1] penta[1] polish[1] polygon scanner[1] porro[1] predesigner[3] principle ray[1] prism[1] ray fan[1] rayleigh range[1] refractive index[1] scanner[1] schott[1] scratch[1] seidels[1] sensitivity[2] setup[1] simulation[1] sine condition[1] sliders[1] solid model[1] spherical[1] sumita[1] surface[1] surface data table[1] surface tilt[2] symbols[1] thin lens[3] tilt[4] tolerancer[4] tolerances[5] tolerancing[2] toroid[1] transverse ray aberration[1] v-value[1] winlens[9] winlens3d[3] x-xy scanner[1] zoom[1] zoom lens[1]