


Play store page for PreDesigner [Lens Calculator]:

Version info
Version 8 [Febuary 2015] has three main enhancemants:
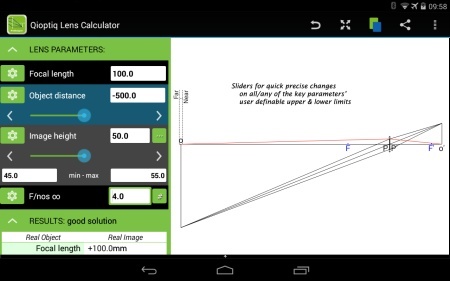
- Sliders to adjust each parameter - user specified upper & lower limits
- improved handling for users with hardware keyboards
- reduction in the number of required Android permissions from five to two
Version 7 [January 2015] offered a wide choice of units - metric & imperial for the different items - previously everything was in millimeters. The different options are accessed via the ‘units’ item in the menu. You may also choose to show the near and/or far sharp planes [depth of field] in the lens drawing.
Version 6 [December 2014] included a refreshed user interface and the new interactive lens nomogram and social features from v5. The later require extra permissions - for our privacy policy.
Background
Qioptiq PreDesigner [Lens Calculator] is an elegant optical design app for Android. PreDesigner includes sliders and a touch-editable ray diagram and lens nomogram, which is great when trying to visualise key optical parameters and their interactions. It also offers precise calculations for specific design tasks.
Tap parameter name[s] to show slider[s]:
PreDesigner [Lens Calculator] is derived from the well tried PreDesigner program for PC’s.
In essence, PreDesigner is based around the simple lens equation & magnification equation [in various forms] and enables you to see the relations between object distance/size, focal length, image distance size, magnification, track and aperture [in terms of stop radius, f# or na].
You select three key parameters that describe conjugates & field, and one that describes aperture. You enter values for the chosen parameters, and the app will then calculate all the remaining first order values for the system. The idea is that you choose the key independent parameters that best describe your task - though we start with a sensible default set.
The sliders enable quick precise changes to the current values without requiring extra typing. To see a slider simply tap on the parameter name of interest. To see the slider limits, long press the same parameter name, that you tapped to show the slider. Tap again to hide the slider etc.
Results table
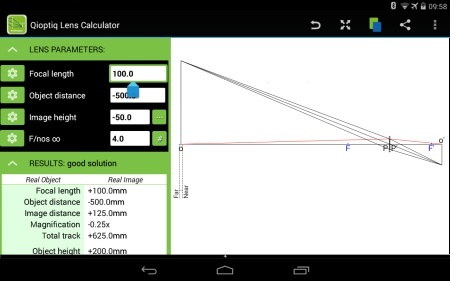
Precise results are displayed in the scrollable table at left, while a ray diagram is shown at right - on high res smart-phones and tablets anyway. On a small screen device, the App has a single column interface and the drawing appears under the parameter section and above the table.
The results table is ordered to show:
- conjugate : focal length, object distance, image distance, mag, track
- field: object height, object angle, image height, image angle,
- aperture: stop rad, f/#, NA object space, NA image space
- max performance: diffraction limit and MTF cutoff [theoretical!]
- depth of field:: circle of confusion, depth of focus, depth of field, near & far sharp and hyperfocal distances
touch-editable graphics
By default, the app shows a ray diagram for the current system with the paraxial ray set. You may choose to display the construction rays which show how the focal points are derived, and ignores the aperture completely.

Here we see the alternative lens nomogram - a three axis graph - a neat way of representing the lens equation linking object, image distances and focal length.
Each has its own axis - object horizontal & image vertical. Note the focal length axis lies at 45degrees & has a scale factor of root2. If this construction is used, then it can be shown that a straight line links all three points [shown here in red].

In tablet mode, the both drawing and nomogram are touch enabled by default, so that you can dynamically adjust:
- object size/distance: by drawing the object line
- image size/distance: by drawing the image line
- focal length: by drawing the front or rear focal points horizontally
- aperture size by dragging first principal plane vertically
- principal plane separation, by dragging the second principal plane [if visible]
NB doing this may change the chosen key parameters!
Options
There are a number of interesting and useful options available on the options page [via the menu]:
- show paraxial aperture rays OR paraxial construction rays
- scale to show ‘distant’ object or image
- label key paraxial points [focii, principle points and nodal points]
- update table whilst ‘drag’ editing the diagram
- enable drag editing on small screens - won’t be very precise
- toggle between lens mode and mirror mode
There are also some advanced options, which are checkbox activated:
- principal plane separation
- refractive index in object space
- refractive index in image space
- wavelength in nm - only effects diffraction limit/ MTF cutoff
For the depth of focus/field calculations you can enter the circle of confusion size
Reset button - will return you to a default design
Users & uses
Typical users:
- Lens designers – especially in the ‘back of envelope’ stage of a design tasks
- Optical engineers & laser engineers
- Researchers
- University lecturers and students taking geometric optics courses at degree or higher. Engineering and science majors.
- High school teachers and physics students: A level, International Baccalaureate, Abitur (All-gemeine Hochschulreife or Matura), AP Physics, Physics SAT etc
- Photographers & Astronomers
- Anyone with an interest in optics
Typical uses:
- teaching basic lens design/optics
- working to understand how parameters like focal length, object distance & height work together
- doing ‘what-ifs’ on the fundamental parameters & space envelope for a real project
- calculating key parameters for a known lens
- determining photographic quantities like depth of field